background

Tuesday, April 29, 2014

Boredom Buster - The Most Boring Bathroom EVER gets a much needed Make Over!


Welcome to the saddest little room in my whole house.  The main floor bathroom.  I have never understood the thought process of what possessed the previous owners of our home to paint the absolute tiniest bathroom the darkest color possible, with the exception of actually painting it black.  This picture really does not do it justice.  It's like 70% cocoa dark chocolate brown, (somehow I can always relate things to chocolate, I consider it a talent. LOL!) and the room probably measures 5' x 5' if I'm being generous.   
 
 
I am actually in the process of refinishing our kitchen table & chairs, so the last thing I needed to be doing was starting another "project".  BUT.....  last week I woke up in the middle of the night with a brilliant idea...I was going to stencil the bathroom walls!!!  Now I don't know about you, but when something comes to me in the middle of the night, I become completely consumed by it and well, I make it work.  Literally, the next day I headed out to get the necessary supplies.  After all, the Mr. was away on a business trip, so the timing was perfect.  I would "surprise" him.  Isn't that what every husband wants to come home to --- a fabulous bathroom makeover. LOL! 
 
My original plan was to repaint the bathroom a more tranquil color, like a pastel grey-blue, but my excitement got the best of me and I literally found myself taping up the stencil, climbing a ladder and stippling on my first square while still in my heels and skinny jeans.  (So glad I don't have a picture of that for you...it was quite a sight. LOL!)   


I came across this fabulous metallic paint to help brighten up and embrace that boring, basic, dark brown.  This stuff is so super cool.  It's perfect for stenciling because it's so thick, almost lotion like.   
 

And in case you were wondering, this is the company that makes the stencil I used.  It took everything in my power to keep me from buying the zebra stencil...as you'll soon discover, I have a tiny crush on anything animal print.


And here is the big reveal!!! 


Isn't it FUN!?!?!  Because the paint is metallic, it really shines when light hits it, otherwise it is very subtle.  My kids now call it "The Fancy Bathroom".    How cool is that???  My 10 year old daughter even brings her clothes downstairs, changes in it, and has practically claimed it as "hers" despite the fact that she has her very own bathroom attached to her room.  I assured her we will stencil something equally as fabulous in hers this summer, and rest assured she will hold me to it.

If you are interested in trying this for yourself, DO IT!!!  I am seriously the most craft-challenged person, and if I can do it, anyone can!  I learned a few tips & tricks along the way so please take the liberty to learn from my mistakes. :)

**  Change into appropriate painting attire before starting. LOL! 

**  Attach stencil to wall using painter's tape.  Do not use the stencil spray.  It leaves a film on the wall, and can effect the paint as well.

**  Use a Styrofoam or a coated paper plate to pour a small amount of paint on.  I used about a tablespoon "glob" at a time.  It dries fast, and this amount is manageable and about how much you need for one square, so you can stop at any time without wasting paint. 

**  Buy an actual stippling stencil brush.  It helps contain the bleeding under the stencil and it goes much quicker. 

**  Dip the tip of the stippling brush in the paint and dab a few times on the plate to help evenly distribute the paint in/on the brush before starting on the actual wall.

**  Buy a stencil that has guides on it to make even spacing easy & quick.

**  Remember that walls are not all "square",  so make sure the stencil is level with a tool before starting.

**  Start in the middle of your wall and work to the sides.  Something I learned after-the-fact, and will have to cope with.  LOL!

Have a fabulous "fancy" day!

Friday, April 25, 2014

Mama Want a Cracker????

I feel the need to apologize.  I have had a bad case of spring fever and have let all my "some day projects" take over my life.  I feel the proverbial clock ticking as summer approaches and my free/me time will be drastically reduced with all the kiddos around.  So I am attempting to get as much done as possible in what little time I have left.  Rest assured I have been busy in the kitchen too creating more delicious (& healthy) recipes, but alas there are only so many hours in the day and thus the blog has suffered great neglect.  The plus side is that I have a stack full of posts just ready & waiting to share with you.  Everything from chalk painting & stenciling walls (my newest obsession) to tofu & graham crackers.  Nothing like a little variety right?!?! 

So let's get crackin'....

I am not a big bread eater.  I've never been a fan of sandwiches, toast, buns, etc.  But crackers are a whole different category.  My absolute favorite snack is peanut butter & graham crackers.  Can you say "healthy nutter butter cookie knock off".  LOL!   I have been determined to recreate a somewhat simple, grain-free version to satisfy this childhood indulgence and I can finally say (in the words of Professor Higgins from My Fair Lady)  "By George, She's got it!"

 
Grain-Free Graham Crackers
 
(these are gluten-free, and dairy-free)


Ingredients:
 
1/4 cup coconut flour
3/4 cup almond flour
2 Tablespoons coconut sugar
1/4 teaspoon salt
1/4 teaspoon baking soda
1/2 teaspoon cinnamon
1 Tablespoon honey
1 egg, slightly beaten
1 teaspoon vanilla
1 Tablespoon coconut oil, melted
 
Directions:
 
Preheat oven to 375 degrees.
 
Line a large cookie sheet with parchment paper.
 
In a medium mixing bowl, combine coconut flour, almond flour, coconut sugar, salt, baking soda, & cinnamon.  Stir to combine.
 
In a separate small bowl mix together honey, egg, and vanilla.
 
Add wet ingredients to dry ingredients and stir until moistened.  Stir in melted coconut oil.  Dough should form a stiff ball.  Chill in the refrigerator for at least 10 minutes.


Roll the dough out to 1/8" thickness (i.e. super thin) between 2 sheets of parchment paper.


Remove top sheet of parchment paper and cut dough into desired shape using small cookie cutters or a pizza wheel.


Bake for 6-7 minutes, or until edges are starting to brown. 
 
Remove from oven, cool for 1-2 minutes & break into crackers. 
 
Store in an air-tight container.
 
I prefer to slather mine with some fresh-ground peanut butter and a slice of banana, but to each their own.
 
Enjoy!!!


Tuesday, April 8, 2014

The ONE thing I Only Buy From Wal-Mart....

First things first, I have nothing against Wally-world...after all, they carry everything from bicycle helmets and hot glue guns to milk and bacon, (talk about one-stop shopping) PLUS they price match, so in all honesty I love Wal-Mart for that.  However, grocery shopping is my "thing".  I know it may sound weird, but it's what makes my heart go pitter-patter.  Some people go for long runs, others like a cup of coffee and a juicy magazine, but for me, it's a grocery store with a beautiful produce section and more cheese and meat than the eye can count.  It is truly my happy place!  For that reason, I tend to shop where there is a higher variety of foods versus a higher variety of merchandise.  I can hardly control my excitement when I think about the fact that all the local famer's markets open in just 4 short days!  Seriously, I would compare it to a 4 year-old anticipating Christmas morning.   The fresh flowers, the home-grown produce, and all the homemade goodies....I am pretty sure I will give myself new wrinkles from smiling so much thinking about it this week. LOL!

All that being said, there is one thing in my mind Wal-Mart has mastered and will always keep me coming back.  The bagged Caesar Salad. 


I am pretty sure you are laughing at me right now.   Seriously though, it IS delicious!  And I'm going to confess, if I am going to "cheat" and eat wheat/grains, those butter-flavored croutons in this kit are on my Top 10 list.  Every single time I make this for guests they ask for the recipe.  It still cracks me up when I write "trip to Walmart" on a card and give it to them.  That one never gets old. Lol!
 
Now that my big secret is out of the bag, you better believe it's on the menu for dinner tonight, maybe I'll have it for lunch too.   


Friday, April 4, 2014

Paleo Chocolate Chip Cookies

Aaah, the "all-American" quintessential dessert.  As a peace-offering to my husband for having to endure watching the children consume each and every girl scout cookie in the house, I made certain to finish tweaking my grain-free, gluten-free, dairy-free chocolate chip cookie this week.  I can assure you I have the most proficient panel of palettes for my taste-testers in the dessert department, and they have all awarded this version the blue-ribbon seal of approval.


Chocolate Chip Cookies (Paleo)

(grain-free, gluten-free, and can be dairy-free with your choice of chocolate chip)

Ingredients:

1 & 1/2 cups almond flour
2 Tablespoons coconut flour
1/2 teaspoon baking soda
1/2 teaspoon salt
3 Tablespoons coconut sugar
1 egg
1 Tablespoon almond milk (unsweetened)
1 teaspoon vanilla
2 Tablespoons pure maple syrup
1/4 cup coconut oil, melted (I prefer unrefined)
1/2 cup chocolate chips (can be dairy free)

Directions:

Preheat oven to 375 degrees.

Line a cookie sheet with parchment paper.

In a medium mixing bowl add almond flour, coconut flour, baking soda, salt, and coconut sugar.  Stir to combine.

In a small mixing bowl combine egg, milk, vanilla, and maple syrup.  Mix wet ingredients until thoroughly blended.  Pour wet ingredients into dry ingredients, and stir to combine.  Pour in melted coconut oil and stir to create a smooth, stiff dough.  Stir in chocolate chips.  Scoop dough on to parchment paper by rounded tablespoon mounds approximately 2 inches apart. 

Bake for 10-11 minutes, or until lightly browned around the edges. 

Cool on wire rack, or enjoy fresh from the oven!

Yum! 

Tips:

* Chill dough in the refrigerator between batches to create optimal results. 
* Baked cookies can be frozen to help maintain the crispy outer texture. 
* Store in an air-tight container to maintain freshness.  Cookies will take on a soft, chewy cookie texture. 

Wednesday, April 2, 2014

Spring Fast Forward

Spring is one of my favorite seasons, second only to fall.  In my mind it just can not beat crisp cool breezes, college football, nights spent sitting in front of a fire pit surrounded by good friends, and the changing of the leaves.  Spring is filled with so many signs of new beginnings and growth, budding trees and plants, birds chirping, and praise the Lord for the end of snow and below freezing temperatures.  However, in our family spring is also like a tightly wound coil that lets loose and greatly accelerates the "speed of life".  The term "spring forward" takes on a much more literal sense for us besides changing our clocks.  The first month is a real challenge as indoor and outdoor soccer seasons overlap, resulting in even more games every weekend with 2 kids playing on different teams.  We also add back in running club, which I help coach, horseback riding, and my oldest just bridged over from cub scouts to boy scouts.  Needless to say we are living outdoors whether it is on the track, at the stables, on the soccer sidelines, or at a campsite.  I wouldn't have it any other way though.  The alternative of being cooped indoors with my three kiddos glued to Mine craft, Fashion Nails, Terraria or whatever "game/app of the week" makes my stomach churn.  In fact, we recently adopted a "no electronics during the school week" rule and I love it.  It was actually a formality because essentially we are never home, but nonetheless it exists. 

I say all this to preface why I have tentatively disappeared, and my recipe posting has been put on hold.  I am actively testing grain-free graham crackers, and my husband has requested an "approved" chocolate chip cookie to help compensate for watching the kids consume all the girl scout cookies in our house.  LOL!  They were the one thing I just could not throw away.  We have been eating clean for almost 8 weeks now and, after one last pantry clean-out last week, are essentially grain-free in our house.  Our vacation over spring break was very eye-opening.  After several days at amusement parks, and 5 days of eating at restaurants, it took my body almost a week to recover!  The optimist side of me would say it was a great learning experience.  I try to keep an 80/20 mindset.  80% clean-eating, and 20% "cheat".  However, I have quickly learned that grain-free for me is not simply a diet.  It is a life-style, and what works for my body to stay healthy, happy, and energetic. 

I have also adopted a few new hobbies recently.  After 7 years, I finally opened one of my Christmas presents and have started dipping my toe in the creative waters of sewing.  I have no earthly idea why I let my fear of perfectionism prevent me from it for so long, but alas, I'm glad I have finally overcome it.  I sewed 2 new pillows for our front porch last week, and I am literally having to discipline myself with a chore list to complete before my next trip to the fabric store.  I jokingly told a friend my kids may have new bedding by the end of summer and now I'm not sure that was such a longshot.  I find such similarities in cooking (which is my first passion) and sewing.  It's like therapy for me to watch the combination of ingredients or materials, mixed with passion and love come together to something wonderful, delicious, creative, and fun.


I also recently acquired another "toy".  After much thought, research, and debate, we joined the Vitamix family this weekend! (insert girlish squeal of excitement here)  Talk about love at first sight, I have a slightly concerning affection for it.  I use it every day for everything from hot fresh soups to ice cream.  The last time I was this excited about an appliance was when we brought home my keurig.  Poor guy probably thinks he's just sloppy seconds now, but I assure him every morning while Vitamix can do pretty much anything, the one thing he can not do is make coffee or tea, and that my friends, is crucial to this momma's happiness.  

Looking forward to posting more recipes this weekend.  I have almost polished up my chocolate avocado mousse, coconut milk ice cream, and my absolute favorite go-to weeknight dinner, Bruschetta Chicken over Spaghetti Squash with Roasted Garlic & Asparagus.  Yum!  My mouth is watering just thinking about it.

I hear the washing machine calling me back to reality.  Have a blessed week my friends!

Thursday, March 6, 2014

Are you Coo-Coo for Cocoa??? (Coco Chip Puffs Recipe)

Some days I want to be like Adam Sandler in the movie "Click" and have a remote to life.  There are the seasons that I would love to fast-forward, the scenes I wish I could delete, the moments I want to rewind and relive over and over again, and then there are days like today where I wish that I could just hit pause.  You see, my oldest is home sick.  Thankfully he is in great spirits and it's a manageable case of strep.  So after the dreaded positive "swab test", and a trip to Target for meds, Clorox wipes, throat lozenges, and a new toothbrush, we had a leisurely afternoon of hanging out.  It was wonderful to soak up some long over-due quality one on one time with him.  He read to me from his latest book, quizzed me on things from the 2014 world records book, and then we watched a little Duck Dynasty.  After lunch he wanted to rest, so I set up camp in the kitchen to whip up his new favorite food for an "after school" surprise snack when his sisters get home.

We actually came up with the name for these while sitting in the waiting room at the walk-in clinic this morning.  These little guys are super easy to whip up, and after some feedback on the brownies, I will say this is definitely a beginner-level recipe. And BONUS, you will be happy to know it only dirties three bowls.  The best way I can describe these little guys is like a fluffy chocolate chip cookie.  It even melts in your mouth.  Mmmm! 


Coco Chip Puffs
(the taste of chocolate chip scone combined with the ease of a drop biscuit)
(these are grain-free, gluten-free, and can be dairy-free with your choice of chocolate chip)


Ingredients:

1 & 3/4 cup almond flour/meal
1/4 cup coconut flour
1/4 teaspoon salt (I prefer sea salt)
1/2 teaspoon baking soda
1 Tablespoon ground flax
1/4 cup honey
1 Tablespoon vinegar
2 Tablespoons coconut milk
1 egg
1 teaspoon vanilla
2 Tablespoons unrefined coconut oil, melted
1/4 cup chocolate chips (I prefer the mini ones so you get a little chocolate in each & every bite)
 
Directions:
 
Preheat oven to 350 degrees.

Line a baking sheet with parchment paper.

In a medium mixing bowl combine flours, salt, baking soda, and flax.  Stir to combine.

In a separate bowl add honey, vinegar, coconut milk, egg, and vanilla.  Stir until evenly blended.

Add wet ingredients to dry ingredients and stir just until all ingredients are mixed together and moistened.  Pour in melted coconut oil and stir yet again.  Now just stir in the chocolate chips and your almost done.

Drop dough by the spoonful onto the parchment-lined baking sheet into 9 biscuits and slightly flatten using the back of the spoon or fingertips dipped in water (to prevent sticking).
Bake for 12-14 minutes until slightly browned around the edges and it feels "set" (or slightly firm) in the center.  Let cool on pan 10-15 minutes before transferring to a plate/storage container.  Honestly, we can not resist waiting and eat them right off the cookie sheet fresh from the oven, but they tend to crumble if you do not let them cool slightly first.

Store leftovers in an air-tight container.

Nutritional Information: (approximate)

Serving: 1 puff

Calories: 200 calories
Fat: 15.5 g
Carbs: 15g
Sugars: 9g
Protein: 6g
Fiber: 3.5g

I promise, this is the closest thing you can have to a cookie for breakfast, not feel guilty about, and will still leave you satisfied for hours.

Enjoy!


Saturday, March 1, 2014

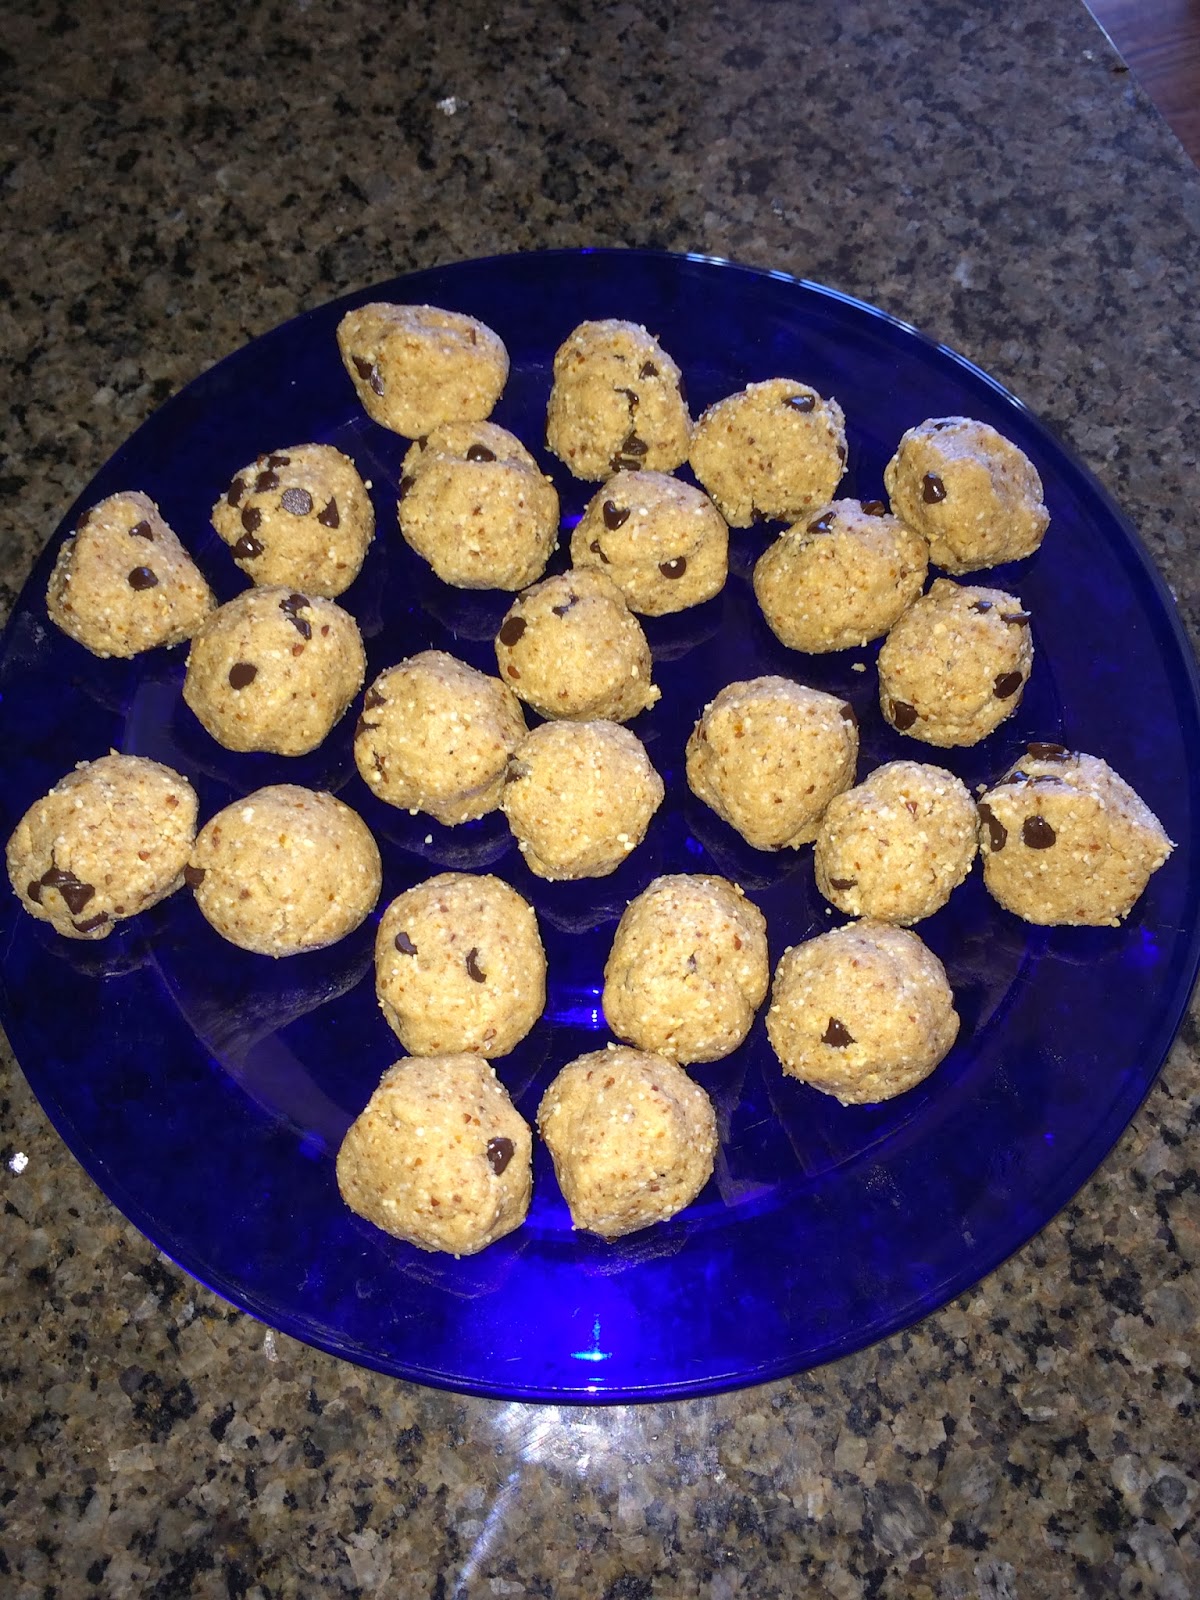
Cookie Dough Balls (Protein-Power Packed)

It has been another busy week in my kitchen, and I have two more amazing recipes to share with you.  These are hands-down my kiddos absolute FAVORITE things to eat for an after-school snack or before a practice, training session, or soccer game.  They have truly enjoyed the "taste-testing & experimenting" process for this recipe, and now request that we have a constant supply on hand.   My husband has even given them his stamp of approval and packs them to eat before or after a workout, or as a quick snack in-between his constant meetings at work.  I have tested them on practically every adult and kid that has entered our home over the past 2 weeks, and even the finickiest eaters have given me a smile and a thumbs up. 

It is always bittersweet to post a recipe.  It's like a baby bird leaving the nest.  I honestly put so much work into them, tweaking them until I find that perfect balance of nutrition and yumminess.  Although I have opted for an alternative way of eating, being grain free, I refuse to give up on taste and texture.  This southern girl will never solely think of food as a source of energy.


Chocolate Chip Cookie Dough Power Balls
(these are grain-free, gluten-free, and depending on your protein powder & chocolate chip, can be dairy-free)
Ingredients:

9 medjool dates, pitted
1 & 1/4 cup cashews, unsalted
1/2 cup almond flour
1/4 cup coconut flour
3 scoops vanilla protein powder
2 Tablespoons ground flax seed
1/2 teaspoon salt
1 Tablespoon pure maple syrup
1/2 teaspoon vanilla extract
1/4 cup mini chocolate chips

Directions:

Combine, dates, cashews, flours, protein powder, flax seed, and salt in a food processor.  Blend until combined and evenly ground.  While food processor is running, add in syrup and vanilla.  Blend until a stiff dough forms. 

Transfer dough to a medium mixing bowl and stir in chocolate chips. 

Roll dough into 1 inch balls, and store in an air-tight container in the refrigerator. 

Makes about 24 balls.

Nutritional Information:

Serving Size: 1 ball

Calories: 90
Fat: 4.5g
Carbs: 8.5g
Sugars: 5g
Protein: 5g
Fiber: 1.5g

Seriously, compare that to your average chocolate chip granola bar that has: 100 calories, 2.5 grams of fat, 18 carbs, only 1 gram of both protein & fiber and 6 grams of sugar.  Which one do you think is going to fuel your body better???


Peanut Butter Power Balls
(these are grain-free, gluten-free, and depending on your protein powder & chocolate chip, can be dairy-free)

These little guys are a throwback to my all-time favorite candy.  In my mind, chocolate and peanut butter were meant to be together forever just like me and yoga pants.  I seriously came up with this recipe one afternoon after we purged our pantry of all candy.  Yes, there were tears in our house for sure.  Now I can enjoy that same beloved combination and not feel guilty about it or have that nasty sugar high & low.  I have yet to not have a kid ask for seconds of this tasty and power-packed snack.

Indredients:

9 medjool dates, pitted
1 cup dry roasted peanuts
1/2 cup almond flour
1/4 cup coconut flour
1/2 teaspoon salt
2 Tablespoons ground flax
3 scoops vanilla protein powder
2 Tablespoons pure maple syrup
1 teaspoon vanilla extract
1/4 cup milk chocolate chips (optional, but included in nutritional info)

Directions:

Combine, dates, peanuts, flours, protein powder, flax seed, and salt in a food processor.  Blend until combined and evenly ground.  While food processor is running, add in syrup and vanilla.  Blend until a stiff dough forms. 

Transfer dough to a medium mixing bowl and stir in chocolate chips. 

Roll dough into 1 inch balls, and store in an air-tight container in the refrigerator. 

Makes about 24 balls.

Nutritional Information:

Serving Size: 1 ball

Calories: 90
Fat: 4g
Carbs: 8.5g
Sugars: 5.5g
Protein: 5g
Fiber: 1.5g

Enjoy!